This week you will practice how to add hyperlinks
- Coverpage with main menu with links to each page
- In slide 2 apply a hyperlink to the image to go to slide 5
- In slide 3 apply a hyperlink to the image to go to any web site
- In slide 4 apply a hyperlink in the image to go to a web site
- In slide 5 apply a hyperlink in the image to go to slide 2
- In slide 6 add the References of web sites visited, as you practice in the table of content practice
- Each slide also should have an option to return to the coverpage
Create a 6 slides powerpoint presentation with the Ecology topic, each slide should have a title, image with borders with animation, add 6 lines of information in size 22, in each image apply a link. (to a slide or to a web page). The coverpage should have a title an your name and grade and main menu with links to each slide.
Save it as LINKS. Good luck!- Insert a coverpage use Insert > coverpage> Conservative
- In home select the tool show and hide (like a black q)
- Position the cursor at the end of your table of content (after the page break) and in there Go to Page Layout > Breaks > Section breaks > Next page
- In page 4 in the top go to Insert > Header > option Blank (first option)
- Click in the option > Link to previous ( to desactivate the option )
- Select the option > Page # > Current position ( page number 4 will be displayed in header)
- Select again > Page # > Format page # > Start at page: 1
- Repeat step 5 and 6 in after page 1 to insert page number 2
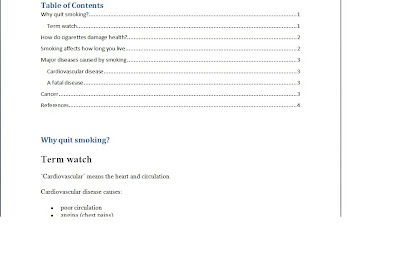
- Update your Table of contents (TOC) with the instruction > References > Update table > entire table
- Repeat the same steps for the 5 last projects finished past week (5 word documents with table of content)
- send to my mail roxy_gzz@hotmail.com before friday 29.
How to create a table of contents
8:12 AM | 0 Comments

- column 1: coverpage with title, small image, complete name and grade
- column 2: why is happening the nunclear radioactivity
- column 3: what about the cooling motors in the nuclear plant
- column 4: consequences of nuclear radioactivity
- column 5: compare with Chernobyl disaster
- column 6: your personal idea about the disaster and references
- add small images in all your columns and everything with your own words.
example of references:
References:
Gonzalez, R(2007) Radioactivity, Retrived on March 19,2011:
http://whatsnuclear.com/articles/radioactivity.html
Buzzle (2009( Effects of Radioactivity, Retrived on March on 19, 2011:
http://www.buzzle.com/articles/effects-ofnuclear-radiation.html
add images and nice design to your brochure.
Use the spelling checker and should be printed in just one page using both sides, can be black and white or color.
Good luck and learn a lot !

- Create a new layer
- Select the brush tool
- Select several colors and paint each logo
- Select Filter>Blur>Gaussian Blur
- Select Pin light filter from Layers window
- Save as, logo1.psd, logo2.psd, logo3.psd in Bimester 4 Folder
Blur>Gaussian Blur
5:58 AM | 0 Comments

February 15,2011
Students will apply the following tools:
Select 3 images of big eyes
- Create a new layer
- Select the brush tool
- Select the brush size
- Select the first color you want and repeat this step with several colors until you fill all the eye with circles.
- Select Filter>Blur>Gaussian Blur and move the Radius to 16 pixels
- Select Overlay in the layers window and the eye will look like a rainbow eye.
- Repeat the same steps for 3 eyes and save them as eye1. psd, eye2.psd, eye3.psd in Bimester 4 folder in your documents.
Have a nice class !
Filter > Brush strokes
5:52 AM | 0 Comments

Students will design an Allegory of the following topics.
* First find out the meaning of allegory
* Topic for allegory one is "your childhood"
* Topic for allegory two is " your teenage"
* 3 images in each proyect and apply Filter > Brush strokes
* For allegory 2, use the lasso tool in a small area of the image and apply Filter > Brush stroke just to that area.
* Finally Type a title to your proyect My Childhood for project 1 and My teenage for project 2 and apply Blending option > Inner shadow and Outer Glow move the slide bars to maximize the effect.
Good luck students, you can do it !